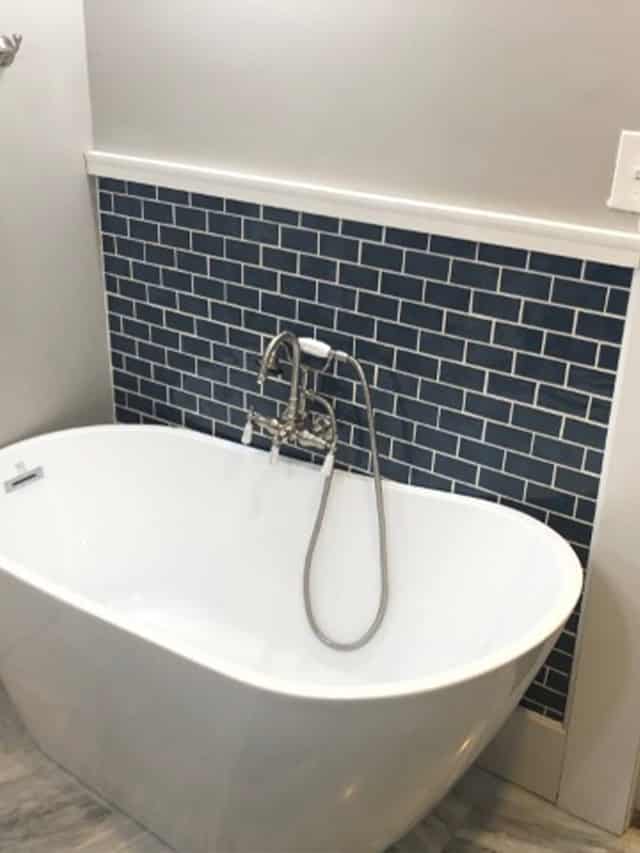
Tubs and Showers
When it comes time to remodel your current bathroom, or you simply want an updated look, tub and shower replacement are a great way to modernize your bathroom's appeal and function. From basic white, one-piece fiberglass units to contemporary cast-iron claw foots, multi-piece arrangements or complete tile walls, tub and shower replacements are an easy way to change the look of your bathroom while opening up the door to many custom and unique options along the way.
Many options are available when replacing a tub assembly. If the tub is a tub/shower combo as in many homes, it has three walls and an entrance, and is normally made of fiberglass. Sometimes one piece, sometimes multi-piece, this assembly can be purchased in many colors with hundreds of wall designs and unique etched patterns. Replacement is basically straight-forward, with the demo/removal of the old tub combo the largest portion of the job. Installation of the new assembly involves hooking up the drainage and tub/shower valve, then sealing everything.
Stand-alone claw-foot tubs are an older design that has recently regained popularity. Elegant and contemporary in appearance, claw foot tubs sit on the floor away from any surrounding walls, with the drain stubbed up from the floor directly behind it. The tub/shower valve resembles a faucet, and is attached to the edge of the tub on a designated end. Claw-foot tubs range higher in price due to their design and construction, and are significantly heavier that standard fiberglass units. Installation is, once again, fairly simple, just setting the tub in place and connecting drainage and water supplies.
Replacing a shower involves a few more decisions. Showers are typically of the fiberglass type as well, while some are complete tile assemblies with a shower pan underneath (see "Shower Pans" section). Replacing a fiberglass assembly with another unit of the same style and size is relatively easy, and the most common type of replacement. The shower valve and drainage are disconnected, and the old shower assembly is pulled out. The new shower is then installed, connecting everything back up and sealing all the edges. Removal of sheetrock or wall material is usually necessary to accommodate the complete installations, as access to the shower valve is necessary. Replacing a tile shower is much more involved, and as such is more expensive. Removal of all the tile work is the first step. This alone is tedious work and can take some time. Disconnecting the drainage and shower valve is necessary. The shower pan is now accessible. If replacement of the shower pan is needed (older pans were made of lead, and often leaked), now is the time to perform that job. Once all prep work has been completed, including valve replacement, drain work, and if necessary, the shower pan, a tile man can now come and reinstall all of the tiling, with thousands of colors and design options. Plumbers DO NOT perform this task. Once all the tile has been replaced, a plumber can come back and "trim out" the shower, installing the shower arm, handle, and trim plate.
Faucets
All sinks in your home have some sort of faucet attached. Single handle or two handle, faucets are the outlets of fresh water inside the house. They come in hundreds of different styles, finishes, sizes, and shapes. Your kitchens, bathroom sink (lavatories), and utility sinks all require a faucet for operation, and we service and install them ALL.
Homeowners replace faucets for all sorts of reasons. Sometimes faucets begin to drip after many years. Some corrode and rust. Some crack or break. Other times homeowners become tired of their current faucets and want to update the look of their kitchens and bathrooms. In 99% of new faucet installations, we recommend that you go out and purchase the faucet of your choice. This is because there are SO MANY different styles of faucets on the market that if we were to simply pick one up for you, the odds of us getting the one you want are slim to none. Buying one yourself guarantees that you will get exactly what you are looking for, and seeing as how our prices rarely change due to the model or brand, your installation fees remain consistent. Fees only differ for lavatory and kitchen faucets. During the installation process, we will remove and dispose of your old faucet, and install your new unit, ensuring that everything functions properly before we leave. Labor warranty is our standard 12-month, with the faucet's warranty depending on the manufacturer.
Not all faucet problems require complete replacement of the entire assembly. In many instances we can make small repairs to the faucet's internal components to stop leaks or other problems. The replacement of small parts such as washers, springs, and cartridges can be a less expensive alternative to complete faucet replacement, sometimes halving the total cost to you. Often times simply repairing the existing faucet will give you many more years of reliable service without incident. No matter what make or model, style or finish, we service all faucets and can find almost any part required to complete the job. As always, all faucet repairs carry our 12-month warranty. Faucet replacements carry this, as well as the manufacturer's warranty on the faucet itself (usually 10 years or lifetime).
Toilets
Ever woken up in the middle of the night to the sound of a running toilet? Stumbling your way through the dark to jiggle the handle has never been a fun proposition, however, almost every toilet will, at some point, begin to run, leak, or make odd noises. This is simply the nature of the parts inside a toilet's tank that comprise the flushing system. With a combination of brass, rubber, plastic, and other materials, there are multiple points for possible failure. Leaks from rusty tank bolts or cracked fill valve shanks are common as well. Fill valves begin to wear out and allow excess water to enter the tank, flappers become warped and allow water to run into the bowl, and even the toilet's flush handle can rust. We will resolve each and every one of these issues for you quickly and professionally, giving your toilets several more years of reliable, trouble-free usage.
When toilets reach a certain age, it is often best to simply replace the entire toilet itself rather than bother with smaller, detailed repairs. If your toilets are reaching 25-30 years of age, the flush pathways inside them are growing narrower and narrower with a build-up of calcium and lime, increasing the probabilities of clogs. There is no repair for this. In such cases, or if you simply want to update the look of your bathrooms with newer and higher quality equipment, it's time to replace your toilets. With literally thousands of different models and styles out there, there is guaranteed to be something out there for everyone. Prices for new toilets can range anywhere from $100 all the way up to and exceeding $3500, showcasing every possible feature you could think of. Though rare on lower priced models, features such as automatic flushing, heated seats, and LED lighting are available. We recommend that the homeowner purchase their own toilets and then have us install them. We suggest this due to the wide variety of toilet styles, colors, and features. We will answer any questions you may have along the way in your search for new toilets, as well as offer advice on brand selection, feature necessities, and pricing options. Regardless of which toilets you choose, we install them all, and we'll even dispose of your old ones for you at no additional charge.
Misc Valves
The water system in your home is a complex network of piping and valves. While the piping tends to require little to no maintenance most of the time, plumbing valves are a different story. These small valves are located everywhere from under your sinks to behind your toilets, from your water heater to your icemaker, from your dishwasher to your clothes washer. Also known as cut-offs, stops, or shut-offs, these valves all perform the same function: stopping the supply of water to a certain fixture or area of the home. There is a large valve one on your main water line close to where it enters the home, next to your PRV (see" Pressure Valves" section), allowing you or your plumber to shut off the water to your entire home, allowing maintenance of the system. While all performing the same function, these valves are constructed in several ways and are used in specific locations throughout the house.
"Stops" is the name generally given to the valves located under sinks and behind toilets. These small, usually brass valves are used to cut off the supply of water to one fixture. They function on a simple shaft and rubber washer system, and often fail after repeated use. Small, slow drips are usually the first sign of an impending problem, and the valve should be immediately replaced.
Gate valves and ball valves are heavier-duty units used to isolate water at specified points of your plumbing system. They are in-line valves, meaning they are installed between two points of a waterline. Gate valves are usually made of brass, and employ a multi-turn handle to open or close a thick brass "gate" inside the valve body, thereby cutting off the supply of water. These valves are often found on water mains, above water heaters, and on various lines throughout the home. Ball valves are also generally made of brass, and are operated using a lever-type handle that swivels a core-less brass "ball" inside the valve body. Because of this design, ball valves require only 90 degrees of rotation to operate, rather than the multi-turn gate valves. While both types of valves function well, gate valves are more prone to failure after many years due to their construction, which employs a threaded brass rod to operate the gate. These rods often corrode and break, rendering the valve useless.
Another type of in-line valve found in some homes (and on most water meters) is called a check valve. This component of the plumbing system uses a one-way "door" inside the valve, which allows water to pass through the valve once, and never flow back through. These valves are generally used to eliminate the possibility of contaminants that have entered the water in the home from passing back out to the county or city lines. Two types of "doors" are employed in a check valve. The first functions just like a door in your home, swinging on a hinge inside the valve, opening and closing with water flow. The other, known as a spring-check, uses a plate attached to a spring that opens and closes with pressure, allowing water to flow around its edges, closing the valve when pressure is equalized.
Just like any other mechanical item with moving parts, these valves fail on occasion. Add to that the presence of water, a highly corrosive (yes, really) liquid, and you have the recipe for problems. We install and replace ALL of these valves and more. We will also install additional valves in areas of your home if you prefer, adding to the serviceability of your plumbing system, saving you time and money during future service calls.
Copper Pipe Repair
A large percentage of America's homes have interior copper water piping, servicing all of the home's plumbing fixtures. Toilets, faucets, water heaters, hose connections...all are often fed by copper piping. Copper is an excellent material to have in your home. It's clean, sturdy, and handles temperature and pressure changes well. But let's face it, even the highest quality products fail from time to time. Copper is no exception. Sometimes, small leaks will form on the joints connecting the copper piping together, dripping, unbeknownst to you, inside your walls or into your ceilings. Transition joints (copper joining plastic pipe) are also common locations for leaks. These small leaks can cause big problems, damaging sheetrock, hardwood floors, and carpeting. We will locate and access these leaks with minimal invasiveness or damage to walls or flooring, make the necessary repairs, and thoroughly test the system before we leave.
Copper piping often services the connections to your water heater. Water heater inlets often leak due to age and to the corrosion of the galvanized stubs that connect the water lines to the top of the heater. We will remove these faulty fittings and replace them with dielectric (corrosion-eliminating) fittings to remove any chance of future corrosion.
Copper was once the most popular material for main water lines, servicing your home from the street. Unfortunately, copper has weak areas that will often oxidize underground, causing severe leaks. It is not ALWAYS necessary to replace the entire waterline when this occurs. As such, we will dig and expose the leak, make any necessary repairs, cover everything back up, restore your water service and leave you with a full warranty. If the leak happens to be located at the penetration point (where the waterline enters the home), we can remove the faulty section and replace it, encasing it within a sleeve to ensure no future corrosion issues.
Slab Leaks
Many homes are built without a basement or crawlspace, instead locating the larger comfort systems (HVAC, water heaters, etc.) in the attic or utility rooms. These homes are supplied with water in the same manner as others, but the waterline penetrates the home through the slab, or the solid concrete foundation on which the home is built. The main waterline generally penetrates the slab at or near the water heater, but branches out underneath the slab to different parts of the house to feed the home's plumbing fixtures, jutting up through the slab at each location and supplying the faucets, toilets, etc. In older homes, the waterlines were made of gray poly (see "Water Pipe Repair" section), and were subject to constant problems. Being buried in the ground under the slab, the gray poly lines would frequently burst or split due to contact with rocks, or suffer similar problems due to temperature changes. But most of all, it was due to gray poly's inferiority as a product. Copper pipes were also used under some homes, and were less prone to leaks. Often times, leaks on copper waterlines under the slab were attributed to the pipe not being properly wrapped or protected. Regardless, water leaks under the slab were problems for obvious reasons, with access to the pipes being impossible without destroying sections of the home's foundation.
When a slab leak occurs, the most common sign is a dramatic increase in your monthly water bill. On occasion, if a hot waterline is the culprit, you will feel a temperature increase on the floor while walking in bare feet. Whether the break is on a hot or cold line, leak detection (see "Water Leak Detection" section) services will be necessary to determine the exact location of the leak. We offer this service at a very competitive rate, and will work the cost into the cost of the repair. Leak detection requires very specialized equipment designed to pinpoint water leaks in almost any location within a home. The equipment is very accurate, usually within inches.
Once the leak has been successfully located, accessing the leak is the next step. To do this, Any flooring in the area must be removed, stripping down to the bare concrete slab. Cutting or jack hammering of the concrete is then necessary to open a hole around the leak. Even then, the waterlines are buried to a depth up to 18 inches. After digging down to the waterlines and clearing away the mud caused by the leak itself, the repair can be made. After this is complete, the lines are pressure-tested to ensure proper operation. The repair is then wrapped, and the dirt is filled back into the hole. We then re-pour the concrete that was removed, leveling and smoothing the surface flush with the surrounding floor. After this new concrete is allowed to dry, the flooring can be repaired or replaced as necessary.
At times, drain lines under slab homes suffer breaks as well. This is often due to faulty initial construction. The drain lines sometimes separate or crack. The problem usually presents itself as a clog or slow-draining fixture, and can only be located with a drain camera. With the camera, the exact location of the problem can be determined, and the slab removed as with a waterline leak. The repair process is similar; fixing the piping, filling the hole, and concreting back over the spot, smoothing it out again. Before the concrete is re-poured however, we camera the newly repaired section once more to ensure that all repairs were successful. We then test the line with water to check for leaks. Once everything is covered up, the flooring may be repaired.